Snipping tool for Mac
The snipping tool you love from Windows, with extras, on your Mac
Your Mac takes screenshots with ⇧⌘4, but not the way your hands learned on Windows. WinPlug Snap works like Windows: Win + Shift + S and the Print Screen key. Then the extras: arrows, shapes, numbers and blur, the text of any capture or its QR code, a coloured background in one click, and captures you can pin above every app.
Free 14-day trial$24 one-timemacOS 14 or later

Snipping on a Mac: what you miss coming from Windows
Coming from Windows, this is where your Mac’s screenshots work differently, and what WinPlug Snap brings back.
| On a Mac | With WinPlug |
|---|---|
| The screenshot keys are ⇧⌘3, ⇧⌘4 and ⇧⌘5, not Win + Shift + S. | Win + ⇧ + S snips an area, and the Print Screen key works too. |
| Screenshots land on your desktop as files, one after the other. | Every capture is copied, and your latest ones wait on the clock. |
| Markup draws arrows and shapes, but has no blur and no numbered steps. | Blur or black out what’s private, and number steps 1, 2, 3 in clicks. |
| Polishing a capture for a slide or a post takes another app. | One click adds a border, a white margin with a shadow, or a coloured background. |
| A screenshot can’t stay on top while you work in another window. | Pin it: it floats above every app, on every desktop. |
| To capture one window, you press ⇧⌘4, then the space bar. | Alt + Print Screen lights up each window: click the one you want. |
Win + Shift + S on your Mac: snip any part of the screen
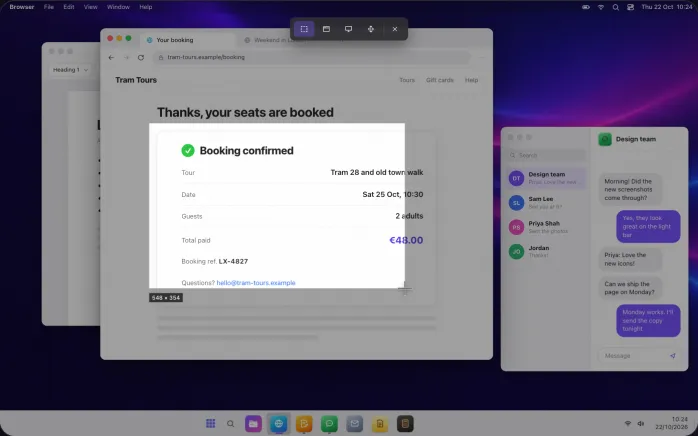
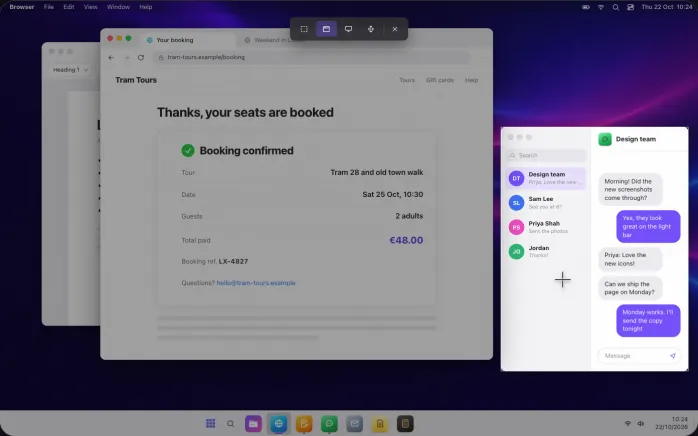
Press Win + ⇧ + S, or the Print Screen key of a Windows keyboard.
The screen freezes and dims, and you draw a frame over what you want.
Let go and the capture is copied, ready to paste, and the editor opens.
Esc or a right-click cancels.
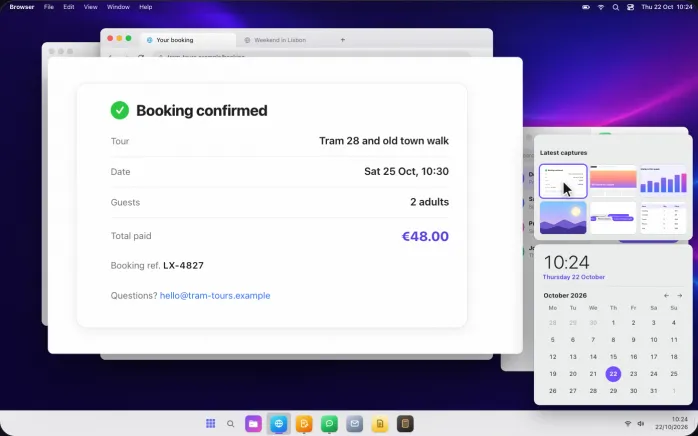
Where do screenshots go on a Mac? Right on the clock
Click the clock in the taskbar: your six latest captures sit above the calendar, and hovering one shows it big.
Every capture is also kept in the capture library, the last 60 by default and up to 300, and in your clipboard history.
Want files too?
Turn on saving to a folder of your choice.
Annotate a screenshot on your Mac: arrows, numbers, blur
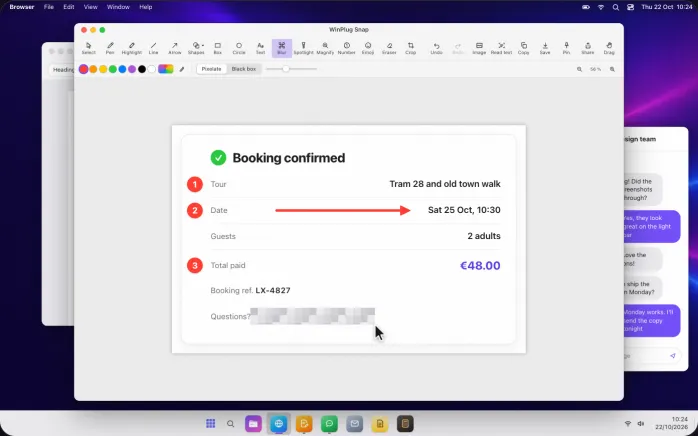
The editor puts its tools in a row, each with its name: pen, highlighter, line, arrow, shapes, box, circle, text, blur, spotlight, magnifier, numbers, emoji, eraser and crop.
Draw an arrow to what matters, click 1, 2, 3 to number the steps, and drag the blur over an e-mail address or a name.
A black box hides it for good.
Draw on a screenshot on your Mac: arrows, callouts, stars
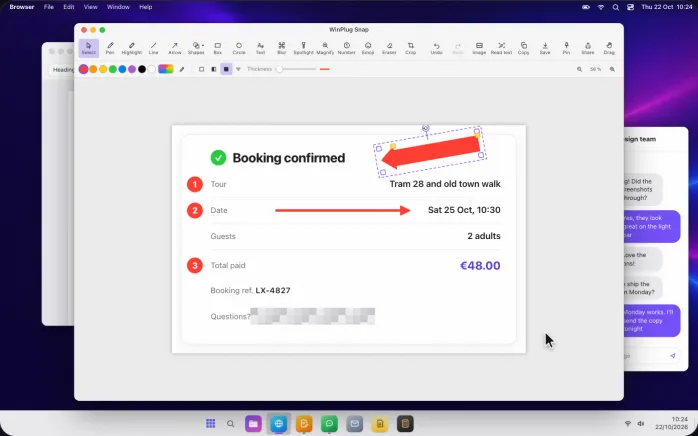
Click Shapes for a gallery of 54 shapes: lines and connectors, block arrows, speech bubbles, a star, a check mark or a cross.
Drag to draw one, then pull its yellow handles to change it: a thicker arrow, a longer head, rounder corners, a bubble’s tail.
The round handle above turns it, in steps of 15° with Shift.
Add text to a screenshot, like typing in a document
Click with the text tool and type: the box wraps on its own as you write.
Select a word to make it bold, italic or underlined with ⌘B, ⌘I and ⌘U, bigger, or another colour, and pick a font, a label or a speech bubble behind it.
Double-click any note later to change it.
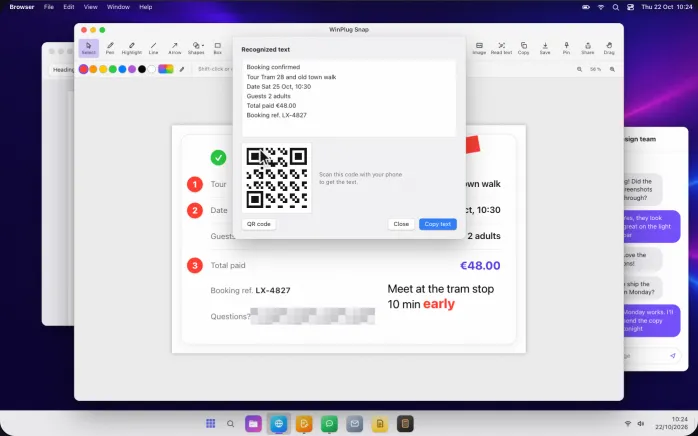
Copy text from a screenshot on your Mac
Read text finds every word in the capture, in English or French, and shows it so you can fix a letter if needed.
Copy text puts it in your clipboard in one click.
Or show it as a QR code and scan it with your phone, to carry a code or a link across without typing it.
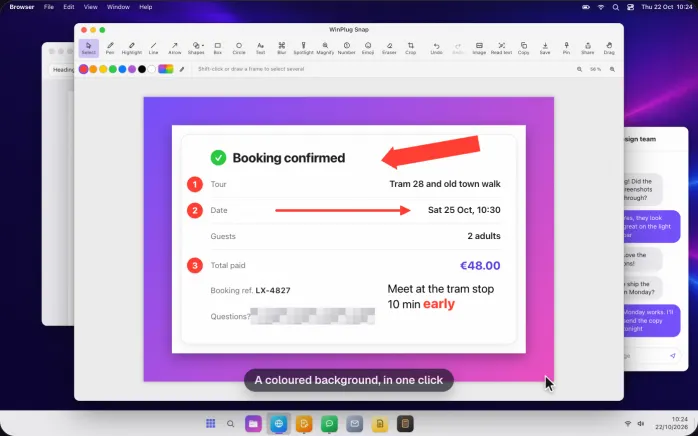
Add a background or a border to a screenshot
From the Image menu, give your capture a border in the current colour, a white margin with a soft shadow, or a violet-to-pink background: ready for a slide, a post or a tutorial.
The same menu rotates, flips and resizes it, and the crop tool offers 12 formats, from 1:1 to 21:9.
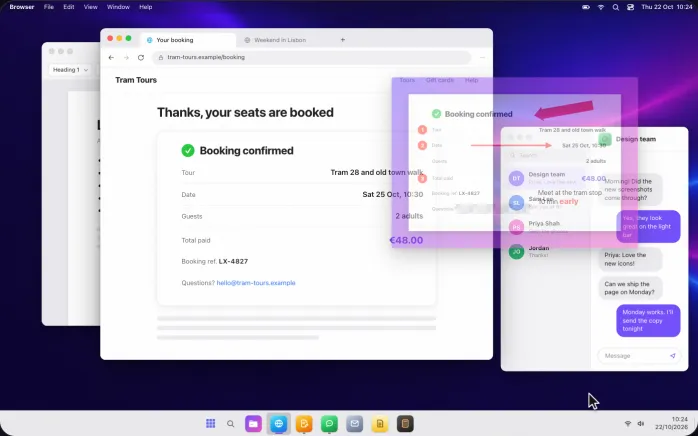
Pin a screenshot on top of every window
Click Pin and the capture floats above all your apps, on every desktop: a reference to copy from while you type somewhere else.
Drag it anywhere, scroll over it to resize it, and right-click to make it semi-transparent, copy it or save it.
Esc or a double-click puts it away.
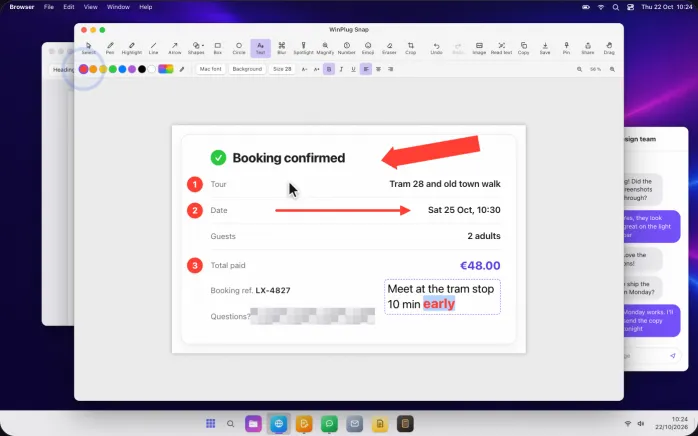
Print Screen on a Mac: capture a window or the whole screen
Alt + Print Screen lights up each window as the cursor passes over it: click one and only that window is captured.
Win + Print Screen takes the whole screen at once, and Alt + ⇧ + Win + S takes the same area as last time.
On a Mac keyboard, Print Screen is the F13 key and Alt is Option.
And also…
Spotlight and magnifier
Darken everything but the part that matters, or enlarge a small detail in a round lens.
Crop to a shape
Crop freely or pick one of 12 formats, from 1:1 to 21:9, then press Enter or the violet Crop button.
A black box
Pixelate with the strength you like, or cover a detail with a solid black box: nothing shows through.
PNG, JPG or PDF
Save in the format you need, or send the capture with AirDrop from the Share menu.
Drag it anywhere
Drag the capture from the editor straight into an e-mail, a message or a folder.
The same area again
Alt + ⇧ + Win + S captures exactly the area you framed last time, without drawing it again.
A delay first
Wait up to 10 seconds before the capture, time to open a menu or hover a button.
Your capture library
Every capture in one grid: open it in the editor, copy it, show it in its folder or delete it.
Windows screenshot shortcuts on your Mac
- Win⇧S
- Snip an area (the Print Screen key does it too)
- WinPrtSc
- Capture the whole screen at once
- AltPrtSc
- Capture one window
- Alt⇧WinS
- Capture the same area as last time
- Esc
- Cancel a capture (a right-click too), or put a pinned capture away
- ⌘BIU
- Bold, italic, underline in a note
- ⌘C
- Copy the capture from the editor or a pinned capture
- ⌘D
- Duplicate the selected drawing
- CtrlAltV
- Your clipboard history, captures included
- Del
- Delete the selected drawing
On a Mac keyboard, Win is the Command key, Alt is Option and Print Screen is F13; on a Windows keyboard plugged into your Mac, they are the keys you know. Many Mac apps use ⇧⌘S for Save As: you can give the area capture another shortcut in Settings.
See it on a real Mac
No mock-up: WinPlug Snap filmed on a real MacBook. Click a feature in the list to jump straight to it.
- Win + ⇧ + S: The screen freezes and dims: draw a frame and the capture is copied.
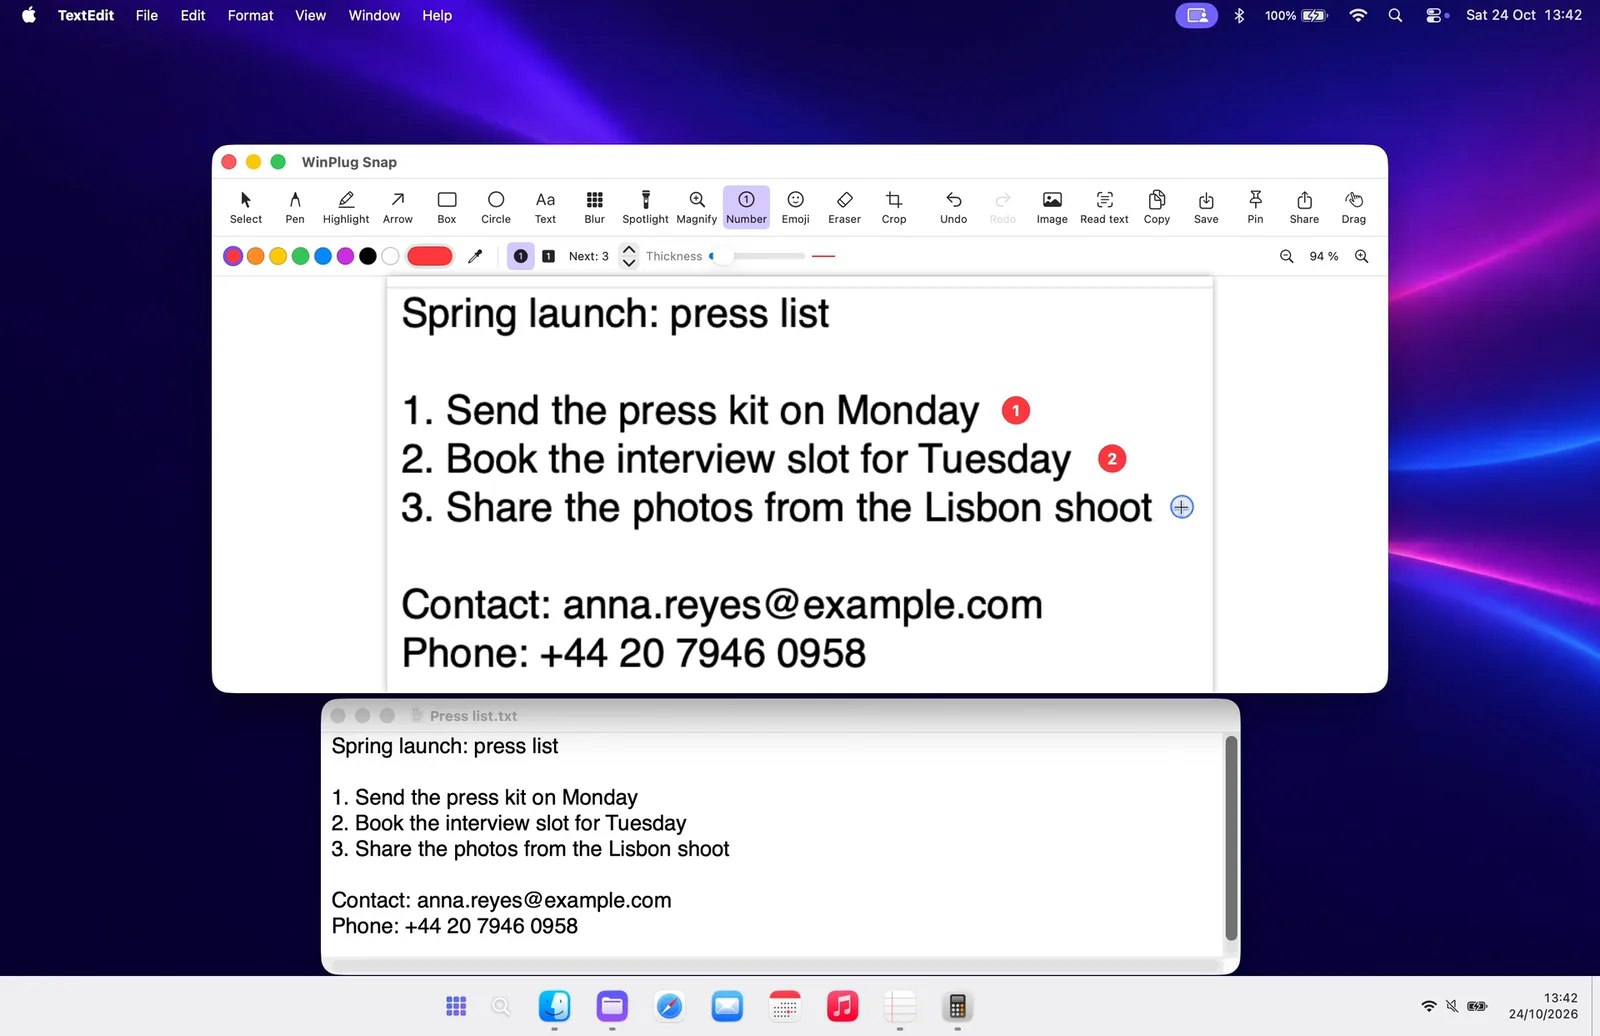
- Numbered steps: Click to number the steps 1, 2, 3, right on the capture.
- Text that wraps: Type a note: the box wraps as you write.
- Arrows: Drag to draw an arrow that points at what matters.
- Blur: Drag over what’s private, like an email address, and it’s blurred.
- Read the text: Read text finds every word in the capture: copy it, or show a QR code.
- Ready to share: From the Image menu, add a border, a shadow or a colored background.
- Pin it on top: Pin a capture and it floats above every app. Drag it anywhere.
- Your latest captures: Click the clock: your latest captures wait above the calendar.
Features in the video
Screenshots on Mac questions
Is there a snipping tool for Mac?
Yes: macOS has its own screenshots, ⇧⌘4 for an area and ⇧⌘5 for a toolbar, and WinPlug Snap adds the snipping tool you know from Windows. Press Win + ⇧ + S, draw a frame, then mark the capture up, blur it, read its text or pin it above your apps.
How do I snip on a Mac?
With macOS alone, press ⇧⌘4 and drag over the area, or ⇧⌘5 for the screenshot toolbar. With WinPlug, press Win + ⇧ + S as on Windows (Command-Shift-S on a Mac keyboard), draw a frame, and the capture is copied and opens in the editor.
Does Windows + Shift + S work on a Mac?
Not on its own: on a Mac, Command-Shift-S is Save As or Duplicate in many apps. With WinPlug, Win + ⇧ + S snips an area like on Windows, and you can pick another shortcut in Settings if you’d rather keep Save As.
How do I print screen on a Mac?
Macs have no Print Screen key: ⇧⌘3 captures the whole screen. With WinPlug, the Print Screen key of a Windows keyboard (F13 on a full Mac keyboard) snips an area, Win + Print Screen takes the whole screen and Alt + Print Screen one window.
Where do screenshots go on a Mac?
macOS saves them as files on your desktop unless you choose another folder in ⇧⌘5’s Options. WinPlug copies every capture, keeps the last 60 in its library, shows your latest six when you click the clock, and can also save them to a folder.
How do I blur part of a screenshot on a Mac?
Markup, the Mac’s editor, has no blur. In WinPlug’s editor, pick Blur and drag over the part to hide: pixelate it with the strength you like, or switch to a black box that hides it for sure.
How do I copy text from a screenshot on a Mac?
With macOS alone, open the image and select its text with Live Text. With WinPlug, click Read text in the editor: every word of the capture shows up, in English or French, and Copy text puts it in your clipboard. A QR code of the text is one more click.
Does WinPlug Snap need any permission?
Yes, one: Screen Recording, which macOS asks for once, the first time you capture. The rest of WinPlug works without it.
One license, every habit
WinPlug Snap comes with 8 more modules: one license, $24 one-time at launch, for 2 Macs, with a free 14-day trial and no account.
- WinPlug TaskbarA real taskbar: every window one click away, previews on hover, a Start menu.
- WinPlug KeyboardYour Windows shortcuts as they were: Ctrl+C, Ctrl+V, Alt+F4, Home and End.
- WinPlug SwitchAlt-Tab window by window, with live thumbnails, search and Peek.
- WinPlug ExplorerA file explorer that cuts and pastes, with an address bar and dual pane.
- WinPlug CaptureRecord the screen, a window or an area, then cut, style and export it in an editor.
- WinPlug ClipboardEverything you copy, kept in a history you can paste from.
- WinPlug LayoutWindows snapped to halves, quarters and thirds, with Win + arrows.
- WinPlug MouseThe wheel scrolls like Windows, the trackpad stays natural, Ctrl + wheel zooms.